Update September 30, 2014: Field tests have been done on filter 10a and 10b. The results are here. According to what the results of these tests show, filter 10a does not work at all. Filter 10b works, but just barely. Neither of these filters are dependable, and they do not produce clean water.
Update August 20, 2014: The 5 gallon filters have been running steadily since March of this year. Water has been running through them every day. So far the best performing filter, for water clarity, is filter 10b. This filter uses .15 mm effective size sand. The flow rate is very, very slow, about 1 1/2 cups per hour. Filter 10a has had a faucet in the output to restrict the flow rate, it uses the coarsest sand .25 mm effective size. After 11 months of running these filters and observing the outputs of each, it appears as though .15 mm effective size sand is the best choice. Also, when putting one of these together, absolutely be sure to rough up the inside of the container before you put sand in and start the operation. Use a least 80 grit sandpaper and make sure the surface is roughed up randomly, and not vertically.
Update April 12, 2014: The 5 gallon filters have been running all this month, and most of last month (March 2014). So far, the best output is filter 10b. It uses .15 mm effective size sand and a very, very slow flow rate (.057 meters per hour otherwise expressed as 3.75 liters per hour which is just about 1 gallon per hour). The most recent post shows the results of a qualitative turbidity test done April 10, 2014 (2 days ago). When time permits we will do a biological field test on the outputs of all 3 filters, 10a, 10b, and 10c.
Update February 9, 2014: The 5 gallon filters have been frozen solid for nearly 2 weeks, along with every thing else outside with the exception of filter 2 and 3 which are fed by warmed water from a subsurface source. This has been a very cold winter here, the coldest in at least 35 years. The temp. got down to -10 deg C (14 degrees F) for 2 nights in a row. More freezing weather is on the way. The filters may not be thawed out until March. When they were running, the water was clearing up nicely. Now, more tests will not be possible until mid-March.
Update December 24, 2013: The 5 gallon filters, 10a, 10b and 10c, stayed frozen until the 18th. They are flowing now, and the output looks as if it is improving as far as clarity (turbidity). We will do a water clarity test as soon as time permits. Filter 10a uses .25 mm effective size sand, filter 10b uses .15 mm effective size sand, filter 10c uses .20 mm effective size sand.
Update December 13, 2013: The sub-freezing weather has stopped, for now. It lasted up until yesterday. There were several nights when the temp reached -12 deg C (10 deg F). The filters are still frozen solid. According to the best forecast, we are due for more freezing weather within the next week and a half. All of the roof water storage is frozen solid so there is no water to run through the filters, even if they thaw out.
Update: November 20; 2013: The sub-freezing weather has arrived here without much warning, starting the night of the 17th. We are now down to -5 degrees C (23 degrees F) at night. All of the 5 gallon filters have frozen. Nothing will proceed this month until (or if) the weather warms up.
The other filters have also frozen. 2 pumps were removed in time, one pump switch was destroyed. We did not expect it to get this cold this fast.
Update: November 18, 2013; Sadly, I’ve made a critical error in putting these filters together. I forgot to rough-up the inside of the buckets with coarse sand paper. See the details in my most recent post.
Update: November 13,14, 2013: After 7 weeks of running time the initial 5 gallon filter (filter 10a) shows some success at producing improved water quality. Ecoli is eliminated from the input water, however; the coliform level is still unacceptably high, and the turbidity is not noticeably improved. The second filter (filter 10b) needs more running time before any meaningful tests are done. At this point in time the output water is only slightly better than the raw water input. It must be noted that at this time of year when rainfall is abundant, the quality of the unfiltered roof water is much higher than at any other time. Also please know that the tests done on these filters referred to in this update were preliminary field tests and were not done by an EPA certified lab. Depending on the weather; it will probably be January or February of 2014 (next year) before any epa certified tests are done.
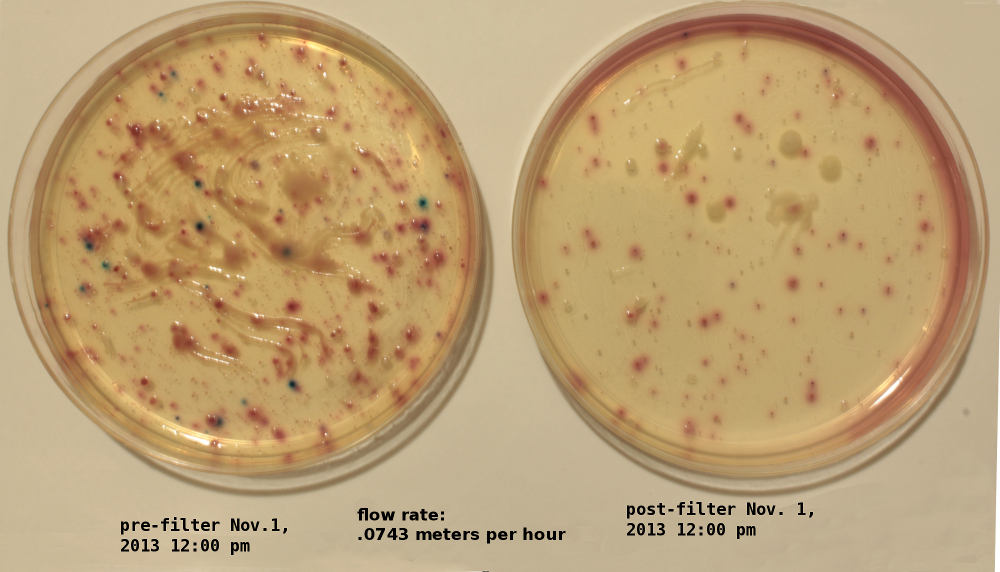
Below see the results of the most recent field test done on filter 10a. There is still no ecoli showing up; but increased levels of coliform bacteria and nonspecific microorganisms are showing up in the output water. Filter 5 (40 inches deep) is filtering water runoff from the same roof surface as filter 10a. The results from filter 5 are also shown along with the results of pre-filter water (runoff from the roof) that feeds both filter 5, and filter 10a. There is a noticeable difference. Filter 10a is very poor at filtering roof water at this location. Filter 5 is nearly perfect.
A new filter (filter 10a) has been started here as of September 16, 2013. This is an experiment. I do not expect this filter to work however; there are those who claim a small filter like this will work to purify water. We will give this filter a fair unbiased test, just like all the other filters we have designed, built and tested here. We will note failures and successes. The final tests will be done by one of the EPA certified laboratories we used for tests on the other filters, and we will post the results here when we have them. Preliminary tests will be field tests. These field tests are not EPA certified, and are not done in a laboratory. This process will likely take at least 2 months, perhaps more. The complete testing of this filter will take between 8 months to 1 year. It will be late summer 2014 before the overall reliability of this filter design is known. We will continue as long as possible.
The buckets are not food grade. The sand was sifted here. We used the “90% retained on 50 mesh sand” portion that we ended up with by sifting .35 mm effective size sand (sold by the Unimin company) through a 50 mesh stainless steel sieve. The sand color is white, it is quartz. We are using a light colored sand so we can observe the formation of the Schmutzdecke. Any sand should work as long as it is not contaminated. Know the source of the sand. Sift the sand using a 50 mesh screen.
The most critical parts of the operation of this filter (or really, any slow sand filter) are the speed at which the water flows through the sand (a slow flow rate is better than fast), the average grain size of the sand (fine sand is better than coarse sand), and the maintenance of an absolutely undisturbed condition on the top surface of the sand (this allows good microbes to grow and then destroy bad microbes). Also, the sand surface must always be covered by (at least 1 inch) of water, and water must run through the filter on a regular basis. If the sand dries out or is even exposed to air, the good microbes will die, and the filter will stop working. The beneficial microbes that make a slow sand filter work need to be under water, and have oxygen to survive; they are aquatic and aerobic. In other words, they need water and oxygen to survive.
The ideal rate of flow for a full size filter is .2 meters per hour hydraulic loading rate. This means the water moves down through the sand a distance of two tenths of a meter each hour – that’s slightly more than 7 inches per hour. This rate is probably too fast for this small shallow filter. We may need to adjust the flow rate down to about 1/2 cup per minute, or less (about 2 inches per hour). The math to figure all this out is here at our main research web site “Rainwater Harvesting slow sand water filter”.
What is this “flow rate thing” and why is it important? The flow rate (engineers call it “hydraulic loading rate”) is just a way of describing, with a number, how fast water moves through the sand in a filter. Water can move through sand without moving the sand, if the water flows slowly enough. This slow flow is what we must have in a biological slow sand water filter. This flow rate, in a large filter, must be kept under .350 meters per hour to keep the sand from being washed down and out of the filter; and to give the stuff in the schmutzdecke time to kill bad microbes in the water and to give the stuff in the water time to cling to the small grains of sand where the rest of the schmutzdecke forms below the very top of the sand surface in the filter container. In our small shallow filter here, we need a much slower rate. We are guessing here at what we need. There is a balance between flow rate and purification efficiency that we do not know for sure yet. The .1 value is our latest estimate of a good balance. We will see as time passes. . . .
This filter is intended to be a biological slow sand filter. This means there will always be water covering the top of the sand, and there will be a living biofilm that will form on and in the top 2 or 3 inches of sand within about 3 weeks after first starting to add water to flow through the filter. This biofilm will contain microorganisms that will stay alive by eating harmful (and non-harmful) microorganisms in the water that flows through the filter very slowly on a regular basis. The water will be only a trickle – about 1 and a half cups a minute at the very most – and probably much less as the filter “ripens”. This is the way a “slow sand water filter” works. The difference here is that we are trying to do this with a very shallow bed of sand. Will it work? Maybe. . . . Directly below this introduction will be updates as we observe the operation on a day to day basis.
| Flow Rate Record. Measurements are at maximum flow (supernatent depth at max) (250 ml is about 1 cup plus 1 tablespoon) | |
|---|---|
| September 23, 2013 (start flow reg.) | .190 meters per hour (250 ml in 1min 12sec) |
| October 2, 2013 (9 days since start) | .0935 meters per hour (250 ml in 2min 27sec) |
| October 9, 2013 (16 days since start) | .0866 meters per hour (250 ml in 2min 39sec) |
| October 14, 2013 (21 days sonce start) | .0846 meters per hour (250 ml in 2min 42sec) |
| October 16, 2013 (23 days since start) | .0775 meters per hour (250 ml in 2min 57.5sec) |
| October 21, 2013 (28 days since start) | .0743 meters per hour (250 ml in 3min 5sec) |
| November 3, 2013 (41 days since start) | .0714 meters per hour (250 ml in 3min 13sec) |
| March 13, 2014 ( 170 days since start including 45 days frozen solid) | .068 meters per hour (250 ml in 3min 26sec) |
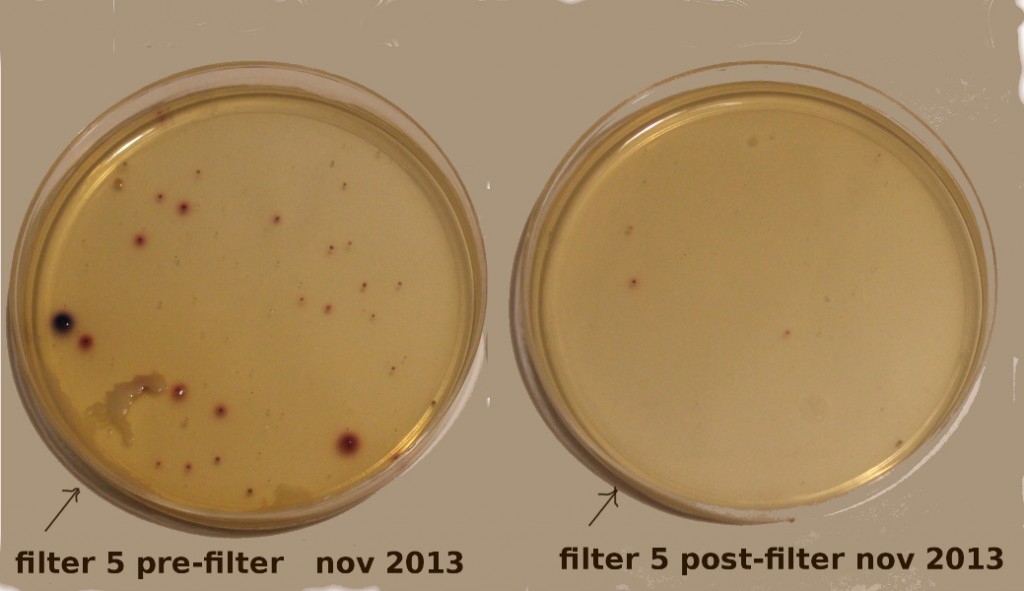
These are the results of the field tests on filter 5 for November 14, 2013. This filter is 38 inches deep. It uses runoff from the same source as filter 10a
Update November 3, 2013: A microbiological water quality test has been done. This is a field test. The results are not EPA certified.
After 6 and a half weeks of running, the filter appears to remove about half of the coliform, and all of the e coli bacteria from the unfiltered input water taken from the roof of the building here. This is much better than expected, but not nearly as good as the larger filters running here in 55 gallon barrels. The flow rate is likely too high. Since we only have 9.5 inches of sand a flow rate of .030 to .100 is more appropriate. The sand depth is only 1/3 of the larger filters. We must reduce the flow rate accordingly? More later. . .
Another test will be done in 3 or 4 weeks, weather permitting. Winter is upon us here, and below freezing weather is forecast within the next several weeks.
Update; October 16, 2013: A new filter (filter 10b) is now operating with this one (filter 10a). The output of this filter runs into the input of the new one. The sand in the new filter is much finer than the sand in filter 10a. We are using the same bucket type. For the sand, we started with .15 mm effective size sand and sifted it through a 50 mesh stainless steel screen. We used what was retained on top of the 50 mesh screen which was 80 percent by weight, and we do not need a valve on the output because the sand is finer and keeps the flow rate down. The rest of the specs on this new filter are the same as the old one (filter 10a).
Update; October 8, 2013: Another rudimentary water clarity test was done today. It looks like the filter is working. I admit I was wrong in my rant about these shallow filters not working. There is a difference in output water. The input water has remained the same. We are seeing a difference, and this is only within 8 days. The difference is subtle, but it is there.It must be realized, however, that the flow rate we are using here is much slower than what is implied on other sites claiming that these filters do “work”. This is not a “rapid sand filter” such as a pond filter, or a swimming pool filter – filtered water does not come gushing out of this little thing. There are a number of YouTube vids showing the ceramic filter inserts mounted in a 5 gallon bucket. The flow rate on those is slow, just like this one shown here. That’s where the similarity ends. This filter is nothing like that. This is a biological sand filter. It works with natural bacteria and other microbes found in all un-sterilized water. The filter media (the sand) stays under water all the time. Unlike the ceramic filter elements, the sand will never need replacement (you can take the sand and gravel out, wash it, set it in the sun to be disinfected, and then put it back in the filter as many times as needed, the sand and gravel won’t “wear out”), and if this filter works, (and it is now looking like it just might), it will remove bad bacteria from the input water. The cost will be under 40 dollars: 10 to 15 dollars for the buckets, less than 5 dollars for the pvc and ball valve, and 3 or 4 dollars for the sand and gravel.
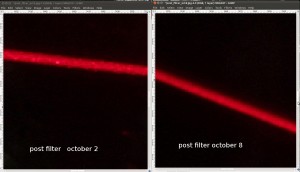
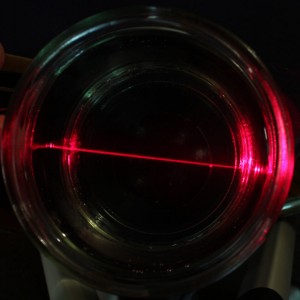
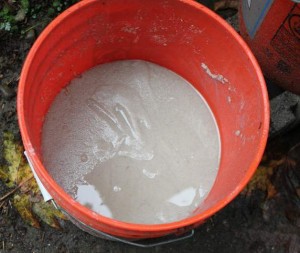
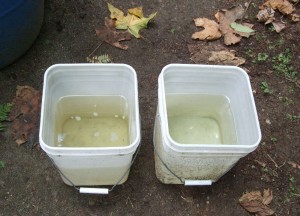
If one looks closely at the images one can see the difference here. Both of these images were taken under identical conditions and processed with identical settings in the Gimp. 15 second exposure time/ f8 aperture setting; Cannon EOS T2i. lighter spots indicate more light reflected which indicates more particulate matter in the water.
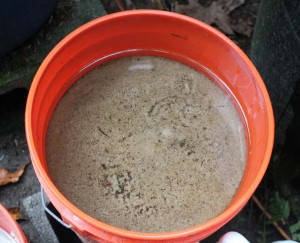
Update: October 2, 2013; A flow rate test was done today. The flow rate is .0935 meters per hour with the flow control installed. This is 3.68 inches per hour. This means it takes water about 2 hours and 35 minutes to flow completely through the filter. This may still be too fast. On the 23rd of Sept., when the flow control was first installed, the rate was .190 meters per hour. A water clarity test was also done today. The second photo down is pre-filter water. There was so much turbidity that the image became over-exposed (the red color turned white). The filter is definitely removing something from the water. The camera and settings are the same on both photos. the two images below were taken with a cannon EOS Rebel T2i on manual settings: exposure time 15 seconds, F8.0, iso 100, using manual focus. The containers are the same type and quality. :

This is water before running through the filter. This water is taken from the output of the first flow diverter.
Update: October 1, 2013; The filter has been running for 15 days now. The flow rate has slowed somewhat, and the output remains clear. We will do a flow rate measurement shortly. images to follow.
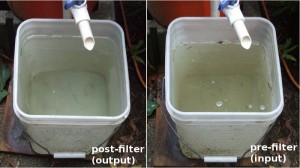
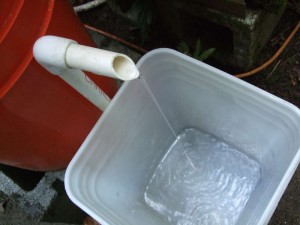
This image shows the input and output of the filter after 15 days of running. The flow control valve can be seen at the top. The flow control was added to keep the flow rate below .1 meters per hour.
Update; September 25, 2013:
Update; September 24, 2013: The formula to figure flow rate is in the image below:
- Flow rate in meters per hour (for the 11 inch diameter 5 gallon filter) equals 55 divided by the time in seconds to fill a 1 litre container. For this filter we are trying to maintain a flow rate at or below .1 meters per hour.
- Measure the number of seconds it takes to fill a 1 liter container, then use the above formula to figure the flow rate in meters per hour. This is an adaptation of the formula for the larger filters.
Update: September 23, 2013; The flow rate has been consistently too fast at nearly .350 meters/per hour. We have installed a valve on the output, and limited the flow openings on the slip cap from four 1/16th inch diameter holes to two 1/16th inch diameter holes in order to limit the flow rate to approximately .190 meters per hour. This is the rate at which we have found, over the past 7 years, to be the best overall compromise between flow rate, and water quality. Even though this filter will allow nearly a .400 meter per hour flow rate; we will keep the rate at the known optimum so as to maintain a non-biased valid comparative test. We want to know if it is possible to make this filter work. Once we know this shallow sand filter will actually remove pathogens, then we will try a more rapid flow rate until the best compromise is found between flow rate and water purity. Update: September 20, 2013; The 1/16 inch holes in the slip cap on the bottom outside of the top bucket plug up very easily. Some sort of screen on top of the bucket is necessary. We used nylon netting doubled up on top of the bucket.
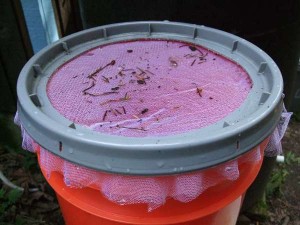
This doubled up netting keeps debris out of the filter and keeps the 1/16 inch diameter holes in the slip cap from plugging up . . . I hope!.
Update: September 19, 2013;
Update: September 18, 2013; So far, the water that has run through the filter is clearing up very nicely, and has a “fresh air after a spring rain” odor. It has taken 3 re-circulation runs through the filter however, to get the water to this point (a 4 gallon bucket filled with raw water that has been re-circulated 3 times through the filter: poured in, collected and poured back in 3 times). All the other filters here use re-circulation. To start with, the input water is somewhat stagnant, yellowish-brown in color, and has a slightly “swampy” odor (I’ll have more images shortly). The flow rate has slowed to about 1 cup (250 ml) in 70 seconds; .2m per hour; or moving through 8 inches of sand in an hour.
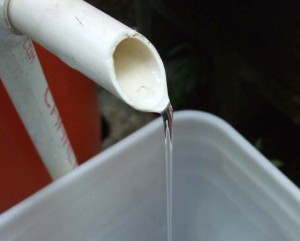
This is what a flow rate of 1 cup in 70 seconds looks like for this filter. This may be too fast for good purification. This flow is moving through the filter at about 8 inches per hour; in other words it takes slightly over an hour for water to move completely through the filter to the output. (.2m per hour).
Update: September 17, 2013: So far the filter has worked to remove “color” from the water. This is raw water straight from the diverter. The same water that goes into filter 1 found on one of the websites associated with this blog. The flow rate on this filter is absolutely critical. If it flows too fast, the sand breaks right through the pea gravel and fills the drainpipes and shows up in the output. The flow rate must be restricted at all times to less than 1.5 cups per minute. If four 1/16 inch holes are drilled in the 2 inch slip cap the flow rate stays below 1.5 cups per minute. When you are putting this filter together, be sure to cap the output pipe, otherwise, water and sand will rush through to the drain pipes as you are filling the bucket with sand. Do not put dry sand into the bucket and than add water. Put water into the bucket first and be sure that the sand is completely saturated with water as each handful is added. Be careful when adding sand to begin with do not disturb the gravel layer. Add sand very, slowly at first. ______________________________________________________________________________________
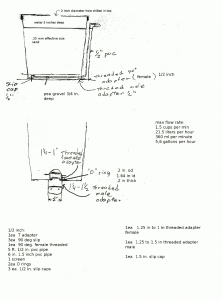
This is unlike any of the other filters running here in that it is made using readily available 5 gallon buckets and pvc fittings, and the sand is only 9.5 inches deep. Usually there is nearly 3 feet of sand in a small slow sand filter. This version uses only slightly more than 50 pounds of sand and several pounds of gravel. This filter can be moved if needed and can be put together in a few hours. The cost is about 15 dollars. The question here is this: Will only 9.5 inches of sand be enough to actually purify water in this small biological slow sand filter? It must be kept in mind that the purpose here is to have this filter work as a biological slow sand filter having a biolayer (schmutzdecke) on top of the sand that removes pathogens from the water that flows through it, in the same fashion as the larger designs that have up to 3 or 4 feet of sand as filtration substance. This filter will take about 2 months to test. The maximum flow rate is 1.5 cups per minute, the recommended flow rate is 1 cup per minute (this is based on the accepted flow rate range of from .1 to .35 meters per hour. ) Water must move through a biological slow sand filter at a slow rate. All of the math and stuff like that will be posted later. In the mean time below are images describing the filter. There are 4 holes drilled in the 11/2 inch slip cap that are 1/16 inch diameter and they are evenly spaced around the cap. The cap has 1/2 inch trimmed off of it to fit into the 3 inches of space where the top of the sand meets the water surface.

This shows the pea gravel covering the drain pipes. Water is added and then sand is added to the water until the sand depth reaches 3.5 inches from the top of the bucket. Be sure to keep the water level above the sand at all times and be sure to cap the output pipe while adding sand. The output pipe assembly should be completed before adding the gravel and sand.
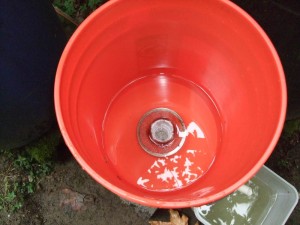
This is the top bucket. The screen is necessary to keep debris out of the small 1/16 inch holes in the slip cap slow drain.

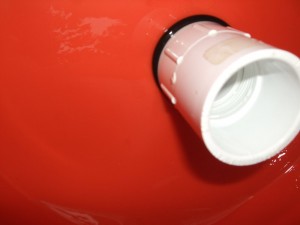
Here you are looking at the bottom of the top bucket from the outside. Note the 1/16 inch hole drilled in the 2 inch slip cap. There are 4 of them equally spaced around the cap. This makes water flow indirectly to the sand; not disturbing the schmutzdecke. The O ring actually goes on the inside of the bucket between the adapters.





This is a great experiment to run. I’ve thought about doing a similar set up because I’ve wanted to gain the experience of running a slow sand filter without the expense and effort of setting it up in 55-gallon barrels. This size looks much more doable.
On a slightly tounge-in-cheek note, if this works, could we also successfully set up a filter in a Big Gulp cup? Now that would be fun.
Thanks for the input, Paul. I hope it works. I have my doubts, but we won’t know for sure until we do the tests. If the water clears up nicely, that is the first step, but clear water can be full of nasty stuff. Sometime in late November, (if all goes well) we should know how this thing is working on taking out bad bugs. That said, even if it gives us some measure of purification, it will be very nice indeed. There is also the option of setting up two of these: one using something like .35 or .45 mm effective size for the initial run, and then having a second filter built the same way, only using something like .15 mm effective size – still much easier, and less expensive than setting up a 900 plus pound barrel full of sand.
These are always interesting to see if they are going to prove to filter the water effectively. And these water filters, if they end up working, would be great for the outdoors, not on municipal water, because of all of the chemicals and contaminants in the water. But I have seen others made, similar to this one, where the top bucket has water filters in them, which last quite a long time, and filter the water properly.